
James' Grumman F6F-3 Hellcat 1/48 - Build Thread
The Beginning
I don't 'do' New Year so as well as getting on with existing models I started another which I also hope will be easy enough for me to finish in a reasonable timescale.
The quite nice Eduard 1/48 Grumman F6F-3 Hellcat.

It's the Weekend Edition kit but I've found it does need some add-ons so I ended up getting the Eduard Zoom set to go with it, and a set of Montex masks.

Looking at some photographs, the kit and Ultracast's Hellcat seats, I decided to upgrade the kit and raided the stock room as is the whole point of running a model-related business 


The bulkhead needs cut up for the photo etched improvements behind the headrest (the basic kit omits the rear view windows, for example) and the big block moulded in place of the tubular structure correctly depicted by Ultracast has to go too so there wouldn't be much of the kit bulkhead left. Hence, I used it as a pattern and zipped my Olfa cutter round it to get a new one from plasticard

The rear windows are now there for the pilot to see through them over his shoulder. Every kit I remember seeing or building of the Hellcat neglects to include these.

So far, I've removed the moulded side console detail and glued on the foldy-uppy PE parts so I could shoot some Colourcoats ACUS09 - ANA611 Interior Green prior to sticking on the pre-coloured brass bits, paint the seat belts and do some of that arty stuff to bring out some details.
Now it's green, this is what the seat and new bulkhead are going to look like, which I personally feel is a vast improvement on the alternative. To be fair to Eduard, the Zoom set does include a fold-up seat which is better than the plastic one, but the seat mounts are still over simplified for my tastes here.

Update #1
I haven't touched a model otherwise since the last post, as I've been pre-occupied with the day job.
I opened the box of the Hellcat again last night. The Eduard kit has quite a lot of flash actually - I spent 15mins or so cleaning up undercarriage legs etc and made some annoying observations. I find (through my own fault) that I've bought two Eduard PE sets recently that aren't really what I wanted. I won't attempt to blame anyone for that but myself - but I did wonder who would want a PE set that comes without seatbelts, engine ignition harness or an instrument panel.

I must admit I consider these fairly standard and it only dawned on me last night that this set is missing the main things I really wanted. The wheels in the kit have better rivals so I shall replace these with Ultracast's Hellcat wheels. On closer inspection, the propeller blades are rather thick and end-on look like cricket bats so that's an excuse to use an Ultracast propeller too. They are on the list to order in from Ultracast in our next re-stock!
I'm fed up buying redundant PE so I've decided to just paint the instrument panel like the good old days, and shall scratch build the ignition harness, also like the good old days.
The seatbelts aren't a problem in this case because the resin seat has them moulded on. The only real progress last night besides scraping off flash was painting seatbelts!

Update #2
I am my own worst enemy. Whilst patiently awaiting the Thundersnowstorm which is due to arrive, I decided I didn't want to go out to the paint factory tonight so I haven't.
Instead I have embarked on a totally pointless venture to fill in the bits that if one pressed one's face against the small rear window glass on a real Hellcat one might see. If they had a torch. On the model these serve no purpose whatsoever besides consuming time with which I could have fitted the little bits of PE were I not procrastinating and avoiding PE.
I started by carefully razor sawing the floor off behind the armour bulkhead.

At this point, the plastic cracked up the middle. It's the first time I've seen this sort of melarkey working with kit plastic!

Ignoring the Modelling Gods' warning I pressed on and made a fuselage frame from plasticard.

The Hellcat had a fuselage fuel tank mounted to that, which I have fashioned from two bits of some rocket-pod type thing from the spares box. The colour and texture of the plastic makes me think they came from the Airfix Canberra B(I)8 I built a while ago. I also sawed a rocket up and used some 10thou thick plastic strip ...


Since the cockpit floor had been sawn short, I added new plasticard strips upon which it could sit:

I then used Blutac to hold bits in situ whilst I glued in bits of strip to give an approximation of the structure there ...

... which nobody will be see through the windows even though it will be light grey! I've got one reference suggesting the fuel tank was green hence it's not glued to the frame yet to (potentially) ease painting.


So that was a bit of a waste of time, but hey, everyone likes messing about with plasticard, right? No? Just me? ahem
Update #3
I fitted some of the fiddly PE parts but thankfully not very many before thinking to check the fit of parts. The side consoles don't fit the fuselage sides - the locating pins on the consoles being much deeper than the holes. The best solution seems to be to remove the side wall locating pins, and it's better to know that before fitting miniscule PE levers etc.


I didn't want to spend any more on PE parts so I have made do with scratching an impression of instruments on to the panel. I painted the instruments white before painting the whole panels with RAF Night (I thought flat black would be a bit harsh) then scraped out as best as I could manage with using an acupuncture needle in a pin vice, before painting Clearfix over the instrument faces when done as is my usual habit

In real life it looks ok-ish if you don't study it too closely.
The fit of the fuselage halves is ok and the cockpit fits nicely between them (including my new frame, which I was slightly worried about).


With respect to the tail wheel, it was either a drill it out and live with it job, or a total rebuild from brass tubes to be able to portray those arms as individual members. I figured it wasn't worth it. I did shorten the main door a bit to better resemble the real thing better, as well as add the tow bar pegs. I don't know if that was standard fit on carriers but many preserved examples show them.

Anyway, I realised I'd glued in the cockpit to one side without fitting the little window . Fortunately the uppermost bits I'd added from stretched sprue were soft and bendy so I was able to slip the glazing in from the top of the fuselage down over the interior bits I made and pop it into position. I glued it with Tamiya extra thin glue. I've now committed and glued the fuselage halves together.

Update #5
I was tipped off there that the cowling on this particular kit doesn't fit very well, so I was looking out for it. Mine doesn't seem to have been quite the headache it proved for the person who warned me, but that's probably because I was looking out for it. The cowling is moulded in 3 pieces; 1 ring for the front then 2 halves split vertically. They just don't go together to the same dimensions as each other basically.
Using his advice I bonded the top seam of the two halves first, then added the ring and glued it 1/4 at a time. The diameter of the cowl halves at was slightly bigger than that of the ring on mine, but slightly small than that needed to fit the fuselage. I sanded a slight taper on to it, but will still have a small gap to fill at the bottom.

Next up the tailplanes (or horizontal stablizers, being American). The port side is fine but the starboard needs remedial work before glue. There's a spacer moulded at the root. On the starboard side it's too tall, meaning a lot of force is needed to mate the leading and trailing edges and if you do persist, the aerofoil section you get is too fat to slot in to the fuselage. On my kit the spacer on the starboard side was around 0.7mm taller than on the port side which was correct.

This is it corrected

The cowling and tailplanes are only placed on (there's Blutac holding the latter). One good thing about Eduard's tooling here is that I think I will be able to spray the camouflage with only canopy masking if I leave the wings and tailplanes off until afterwards. The plug-in fit means there will be no visible seam to deal with.

Update #6
I can't seem to help but interfere with this model.
Tonight I complicated matters by thinning down the cowl flaps (in US lingo) to offer a more scale-like appearance, and razor sawed them out so they could be cracked open a touch. Here's the before and after:


The windscreen is on now, but I've had a mishap with it. I used my now-usual technique of wicking Tamiya Extra Thin into the join with the fuselage, but the combing is a very close fit with the glazing above the framing lines which wasn't apparent until I touched the glue brush and it drew the glue up the inside of the glazing. If I get another Eduard F6F I'll make sure it's a -5 so I can swap out the spare -3 windscreen, but for now I'll just live with it.
I haven't built the wings yet, but the glazing was sprayed Interior Green. I've black based the fuselage, cowling and tailplanes & elevators with Alclad black lacquer base which is smooth and fast drying.
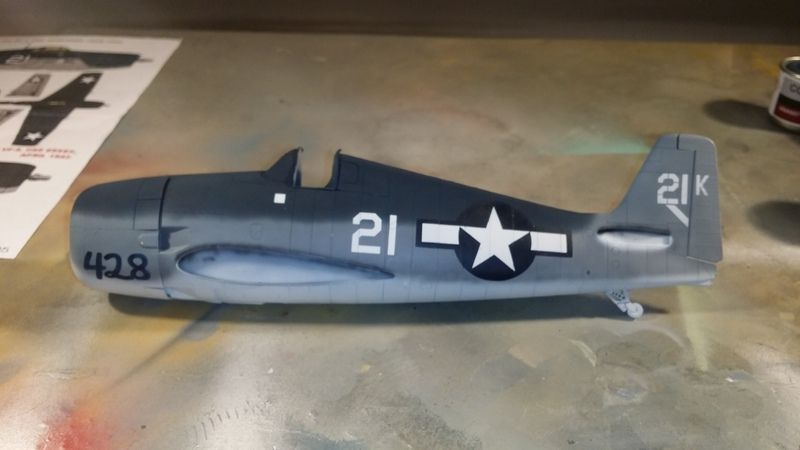
Oh - and I was pleased to find a photograph of "my" Hellcat - now I have a good steer on the nature of the paint work on this particular aircraft. Now to see if I can approximate it! The free-hand spray painted numbers on the cowl might be a challenge, but at least the photograph shows the non-specular sea blue and intermediate blue to be a fairly sudden transition on the fuselage, whilst the intermediate blue to insignia white transition is very rough with apparently several horizontal passes with a spray gun to try to blend them on the cowl, but with a sharper transition on the rear fuselage. The semi-gloss sea blue transition to insignia white on the leading edges of the wings is sudden and the transition is at the extreme leading edges, rather than wrapped under the leading edge a bit like some I've seen.

Update #7
Time for some white

I'm using this thinned 50/50 with our own thinners, spraying at 15psi through a Badger 150.


It's all personal taste really isn't it? Anyway, I like playing with these different techniques but my personal preference is to take it to the point where it's not immediately obvious that it's been done. I personally feel it's a bit artificial and "in your face" when the effect is heavier.
Update #8
I masked the white bits - there are markings on the fin too but that mask will be much easier used to mask of the blue and spray the white - and have applied ANA607 Non Specular Sea Blue to the upper fuselage.


I'm giving that 30 mins to dry whilst I type this, have a cup of tea and cake then I'll crack open the ANA608 Intermediate Blue.
Update #9
And the intermediate blue is now done too. Most photographs give the impression that the intermediate blue was quite crudely applied and non-uniform in coverage, so I've had a go at mimicking that. How successful it's been is up for debate I guess!
I've botched the white under the tailplanes so will fit that when I paint on the markings on the fin.


One more - the white touchups are done, and I've added the ANA606 Semi-Gloss Sea Blue overspray on to the fuselage, and sprayed the tops of the tailplanes & elevators.

Update #10
 The masks for the ACUS39 - ANA605 Insignia Blue have been applied, the colour sprayed, and demasked. It's beginning to look Hellcatish ...
Update #11
I spent the past couple of nights working, but to try to maintain some momentum I did a token amount of Hellcat this evening. I sprayed the engine cylinder rows with Alclad dark aluminium. The pushrod tubes were normally black on a P&W R2800 though, and there is a tube for each inlet and outlet valve pushrod. There are two rows of cylinders, each with 7 cylinders. That equals 28 pushrod tubes to paint black.
Now, anyone who's known me a while will know two things about me. 1) I'm honest. I don't like brush painting much at all. 2) I'm lazy.
I quickly realised that if I cut a V into a piece of card I could spray black through it.

Test run with more Alclad:

Done. Much faster than brush painting. I'm all about speed and time efficiency. I want everything done as fast as possible without really hurting the risk or the out-turn product. I'd call this little cheat a success. Definitely something to remember for my next 4 radial engine bomber!

I also sprayed the reduction gearbox casing grey. Or gray. Or something.

Update #12 Miniature update:
I have assembled the engine. It looks extremely basic like that though, so some detailing with wire seems mandatory. I keep looking at the Quickboost and Vector engines and wishing I'd bought one of those instead, but I'll just plod on and dress this one up and hope it looks passable. I think I'm getting fussy with my old age because I wouldn't have thought twice about it a few years back but now I have a nagging doubt that the kit engine is going to annoy me forever more.

Anyway, on to the wings. These need some cleanup. There's a lot of flash, around the wing tips, in the undercarriage wells and blocking the empty case ejector holes under the wing. There are also large ejector pin type protrusions that will prevent the two halves from mating, so if you're building one of these, TEST FIT EVERYTHING BEFORE GLUING!


Once cleaned up though, the two halves do fit together fairly well. The nav light cutouts don't marry up top and bottom, but that's fairly common on kits.

Update #13
We have wings!
Ok, they're not the right colour yet but it's a start ...

The wings are painted. The blue is a hard colour to photograph at night time


The white was sprayed first so that the numbers and stars could be masked off.
Update #14
I've been up to my eyes today so have rushed this all a bit, and it shows in the finish which is a little rougher than I'd have liked, but it's not the worst I've done.

There's only been time to quickly get the last of the insignias done and I have to go do other stuff.
So, last masks on:


The Montex masks are quite stretchy, which is good for fitting around inconvenient features on the surface! For panel lines, I run along the mask with my steel paint stirring stick (Tamiya) to press the mask right into the panel line to prevent bleeding.

Doing that, and going very light & dry at low pressure with very thin paint there's no need to seal the masks with the colour underneath, like so ...
First pass:

Second pass:

Third pass:

It flashes off so quickly that bleeding just isn't an issue, and ridges built up along the masking lines are almost non-existent.
Just two passes for the upper surface:


And the underside numbers for good measure:


Demask, and motivational trial assembly (with blutac to hold the tailplanes on):


With no masking between the blue and white upper and under surfaces, there's a nice feathered transition on the leading edges like the photos of the real thing usually show:

And since my phone does them automatically, a "vintage / faded" filter applied:

And in greyscale:

I still need to dress that engine up, and I think I'll do some of the exhaust weathering and wing walkway distressing whilst it's in bits too. I reckon it'll be easier.
Update #15
I made a start on exhaust deposits. As thought, it's easier with the wings off given the absence of wing fillets and the dirt getting right into the corner of the wing/fuselage. Photographs seem to show a lot of lead from the upper stacks dominating the streaking, but with the lower stacks being oily (intuitive, since radials need pulled through before starting up to clear oil out of the lower cylinders which then gets blown out the exhausts in a big cloud of blue smoke), so I'm trying to replicate that. It looks a bit strange just now with only the exhausts done, but I'm hoping it all comes together to look like a typical well-used carrier borne Hellcat as it progresses:


I've done zero modelling for a month or so. I just haven't been in the mood. I'm still not to be honest, and do not want to commit to finishing this Hellcat with the kit engine. It's really bothering me, and I think I will need to source a replacement.
The Ultracast propeller and wheels arrived several weeks back though, and I was able over the course of today to drum up enough motivation to apply a few colours of paint to the propeller.


I just went with Willow Green for the dome.
As usual, the castings are beautiful and accurate. The blade profile is spot on, as you'd expect from Ultracast.

Comparing the kit part to the replacement, the kit hub isn't great at all. The Eduard blades are quite good in profile (if missing a kink in the leading edge at the root, but that's being picky) however the plastic blades are rather thick.


Another huge update - the blades are now painted

Apologies for the pathetic update. I intended to do some ship modelling last night, but had to work instead and then discovered my personal compressor had been requisitioned for business use during the day and was out in the paint shed, so I abandoned that idea.
Still *entirely* not up for trying to do anything with that engine, I instead sawed the propeller parts from the casting blocks and assembled them. The castings are so precise that there is no glue used and no urgent need of any.


The propeller is my favourite bit of this model now and I'm very pleased I got it.
Update #19
I'm seriously struggling to find motivation to finish this one. It's not that it's a bad kit - I am simply not enjoying building it. Still, it's irritating me that it's just sat there so I want rid of it from my WIP area.
To that end I decided the Eduard engine will have to do, and added the conspicuously missing ignition harness from copper wire.
I still don't like it, but it'll do.

Update #20
still have to do something about the exhausts before gluing the cowling on, but it looks ok together. I like having the wings and fuselage the right colours. I can't fail to notice that on models now. Thinking about it, I don't think I've seen another tricolor scheme model that hasn't just had "FS35042" on all the upper surfaces.


I officially hate this model.

I got it back in with superglue and pointy tweezers, but it didn't sit completely level when drying which changed the rake angle of the undercarriage leg. I adjusted that "manually" and it looks kinda OK-ish now. I just want it over with now.
The wheels are on and the exhausts are on. The undercarriage legs in the kit are very detailed and fit together well, but any paint on the stab-ins for the legs to wheel wells needs to be scraped off prior to trying to insert them - they appear to be zero tolerance fits. The injected wheels in the Eduard kit did not impress but the Ultracast ones are much nicer and easier too, not having 4 parts per wheel and the tyre split in two with no locating lip and a seam to sort out, negating any advantage in being able to paint hubs and tyres separately.


Exhausts (I'm glad I scraped away the excess thickness of the cowling here - it looks much better)


And on its wheels.


Update #22
The Master machine gun barrels are very, very nice indeed. I am very pleased I bought them!

These were sprayed with Alclad Steel but still look a little golden now they're fitted. I shall perhaps do some localised masking and try again.

The undercarriage doors are fitted now and all of the little bits added including the PE cockpit sills and the sliding canopy painted. Besides a bit more weathering, the antenna and the clear lenses it's about done.


Update #23
Lenses were tinted
... and fitted
Calling it finished now.